Ilohnoh1
3rd Level Red Feather
- Joined
- Apr 4, 2008
- Messages
- 1,714
- Points
- 0
First of all I would like to say that I nicked one of FeatherHead's pictures for this short tutorial, I hope he's willing to forgive me for that as well as my suggestion on how colouring can be improved.
That's not to say I don't value the time and effort he has put into applying colours to these pictures... on the contrary. I very much enjoy coloured pictures above black and white, but it is so unfortunate that people still keep spending many more minutes on a technique to get some colour to a picture than is really needed, because colouring can be done much faster with also a more smooth effect.
I myself am guilty of colouring the 'hard way', and when I found out how I could deliver a much nicer colouring job with less than half of the work and annoyances, a whole new world opened to me!
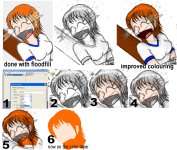
(See the attachment for examples and steps)
You will need a good tool (PhotoShop will do, I myself use Paint Shop), because you won't pull this off with Microsoft Paint. Unfortunately. You do not need a lot of experience with the tool, nor need to know it well. The only very important thing you need to find out about is something called "LAYERS".
Unfortunately I can't advice how you get layers to show up, what they are exactly called, etc. in PhotoShop as I don't use that, but in Paint Shop you can access the layers window from the icon tool bar on the top of your screen. It is an icon of a red and blue square, slightly overlapping.
When you have found your layers, you'll see that the 'background' layer of your current image is open, and it's the only layer you have right now. You need to add a layer, which acts a little like a transparent sheet of plastic which you put on top of your original picture. (#1 in the picture shows the layer creation window of PS). Now by default, whatever you paint, draw or colour on top of that new 'top layer' will go straight over your background and you will find out the layer is not transparent at all! So, we have to tell the program how this layer reacts, and in Paint Shop that is called 'Blend mode'. By default this is 'normal', but now we put it to 'Multiply', which basically adds the lines and colours you apply on top of what is visible on the layer(s) below. This is a miracle the first time you see it. 🙂
The other great thing about this is that you don't have to worry anymore about stray pixels that prevent you from filling up an area (with the floodfill tool), and you don't get these ragged edges around lines because the colour there wasn't just quite white yet. In fact: You don't need to worry about anything on the basic layer AT ALL! You can just leave your lines, smudges, pencil shading and little details in without them hurting your colouring work.
#2 Instead of having to 'steer around' the eyes, mouth, etc. you just make a selection (with the lasso tool) to cover the entire face. It is actually better to cross the lines in areas that will later have another colour, because that will make for a more smooth effect in the end.
#3 then you apply the flood fill (still on the transparent (Multiply) layer). You now see that the whole face is coloured, even areas that were grey instead of white, and that the eyes have not disappeared. Everything looks really smooth, in fact.
#4 Now you make a new, similar selection over the hair. This time you keep to the lines, because you don't want to recolour your face with the hair colour.
#5 Use the flood fill and there you are! The piece is coloured, without loss of extra hair strands, shades, and so on. If you did have those, it immediately gives the drawing a little volume as well, without needing to make shades in colour. (Which you can in fact do in several different ways but I won't discuss those now).
#6 If you make the back layer 'invisible' you can see what you have done on the colour layer. That now contains the face colour and hair colour, without any white in between (that's why I crossed the lines first).
Basically you work your way through the whole picture from here, and you'll end up with what I drew on the top right.
One final tip: Try to always first colour things that are furthest on the background. It's much harder to add in sky and such later, while at the beginning you don't yet have to worry about going over the hair and face.
I hope this helps some more artists on the way to make their colour work both look nicer AND a load easier to do. Better to keep those hairs on your head than pulling them out, eh?
Enjoy, I think you'll find this way of colouring quite much fun.
Ilo.
That's not to say I don't value the time and effort he has put into applying colours to these pictures... on the contrary. I very much enjoy coloured pictures above black and white, but it is so unfortunate that people still keep spending many more minutes on a technique to get some colour to a picture than is really needed, because colouring can be done much faster with also a more smooth effect.
I myself am guilty of colouring the 'hard way', and when I found out how I could deliver a much nicer colouring job with less than half of the work and annoyances, a whole new world opened to me!
(See the attachment for examples and steps)
You will need a good tool (PhotoShop will do, I myself use Paint Shop), because you won't pull this off with Microsoft Paint. Unfortunately. You do not need a lot of experience with the tool, nor need to know it well. The only very important thing you need to find out about is something called "LAYERS".
Unfortunately I can't advice how you get layers to show up, what they are exactly called, etc. in PhotoShop as I don't use that, but in Paint Shop you can access the layers window from the icon tool bar on the top of your screen. It is an icon of a red and blue square, slightly overlapping.
When you have found your layers, you'll see that the 'background' layer of your current image is open, and it's the only layer you have right now. You need to add a layer, which acts a little like a transparent sheet of plastic which you put on top of your original picture. (#1 in the picture shows the layer creation window of PS). Now by default, whatever you paint, draw or colour on top of that new 'top layer' will go straight over your background and you will find out the layer is not transparent at all! So, we have to tell the program how this layer reacts, and in Paint Shop that is called 'Blend mode'. By default this is 'normal', but now we put it to 'Multiply', which basically adds the lines and colours you apply on top of what is visible on the layer(s) below. This is a miracle the first time you see it. 🙂
The other great thing about this is that you don't have to worry anymore about stray pixels that prevent you from filling up an area (with the floodfill tool), and you don't get these ragged edges around lines because the colour there wasn't just quite white yet. In fact: You don't need to worry about anything on the basic layer AT ALL! You can just leave your lines, smudges, pencil shading and little details in without them hurting your colouring work.
#2 Instead of having to 'steer around' the eyes, mouth, etc. you just make a selection (with the lasso tool) to cover the entire face. It is actually better to cross the lines in areas that will later have another colour, because that will make for a more smooth effect in the end.
#3 then you apply the flood fill (still on the transparent (Multiply) layer). You now see that the whole face is coloured, even areas that were grey instead of white, and that the eyes have not disappeared. Everything looks really smooth, in fact.
#4 Now you make a new, similar selection over the hair. This time you keep to the lines, because you don't want to recolour your face with the hair colour.
#5 Use the flood fill and there you are! The piece is coloured, without loss of extra hair strands, shades, and so on. If you did have those, it immediately gives the drawing a little volume as well, without needing to make shades in colour. (Which you can in fact do in several different ways but I won't discuss those now).
#6 If you make the back layer 'invisible' you can see what you have done on the colour layer. That now contains the face colour and hair colour, without any white in between (that's why I crossed the lines first).
Basically you work your way through the whole picture from here, and you'll end up with what I drew on the top right.
One final tip: Try to always first colour things that are furthest on the background. It's much harder to add in sky and such later, while at the beginning you don't yet have to worry about going over the hair and face.
I hope this helps some more artists on the way to make their colour work both look nicer AND a load easier to do. Better to keep those hairs on your head than pulling them out, eh?
Enjoy, I think you'll find this way of colouring quite much fun.
Ilo.
Attachments
Last edited: